Lunch Bag
Two years ago, I found a really cute sushi print fabric while visiting Vancouver, B.C. It was in the remnant pile, and I could find only one piece less than a yard. Ever since I brought it home, I've been waiting for inspiration to make a lunch bag out of it. My first attempt, sans pattern, didn't turn out so well. I had to scrap it but will try to salvage that piece of fabric.
For my second attempt, I found a pattern for a makeup travel case (Handmade Style, by Anna Graham, 2015) that I altered slightly to make a lunch bag. When I first read through the instructions, I was overwhelmed, as I usually am when reading pattern instructions. As I went through it, though, I found the instructions pretty good and much easier to understand than most instructions.
The pattern actually calls for a zippered pocket and gathered, divided pockets for the interior. Helpful in a traveling makeup bag, but since this is just a lunch bag, I decided to skip those portions.
Here are my revised dimensions (I didn't have enough sushi fabric left to make it full size, so I shortened the length by about 1"):
Exterior
(2) pattern (rounded rectangle)
(2) 2.5 x 30.5" gusset
(1) 5.25 x 5.5" hinge
(1) 2.25 x 13" handle
Canvas
(2) pattern
(2) 2.5 x 30.5" gusset
(1) 5.25 x 5.5" hinge
Lining
(2) pattern
(2) 2.5 x 30.5" gusset
(1) 5.25 x 5.5" hinge
(1) 8 x 13" handle
Batting
(2) pattern minus 0.5" around entire border
(2) 1.5 x 29.5" gusset
(1) 4.25 x 4.5" hinge
Heavy weight double-sided fusible interfacing
(2) pattern minus 0.5" around entire border
30" zip
2.5 yards 1" cotton twill tape
Assembly:
 |
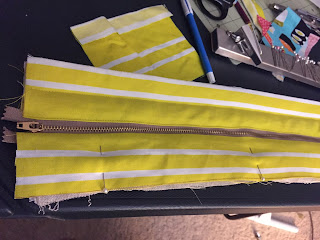
| Making the handle and assembling the top and bottom pieces were pretty straightforward. They just required lots of layers -- fabric, batting, interfacing, and canvas. |
 |
| I aligned my gusset stripes well but realized my hinge stripes don't line up with the gusset stripes. Doh! Oh well. I'll just say I meant to do that :) |
 |
| It took a while to stitch just past the cording, but I eventually got it done, and it looks decent. |
 |
| I did mess up a few times and stitch over the piping, but all in all, not bad for my first time. |
 |
| I decided to try this bias tape I had made using scrap fabric. There's a LOT of room for improvement here, but I was glad just to be nearly done! |
This is the way the print should have been oriented, but since I attached it upside down, the print faces the wrong way when I open the bag.
|


Comments
Post a Comment